Introduction
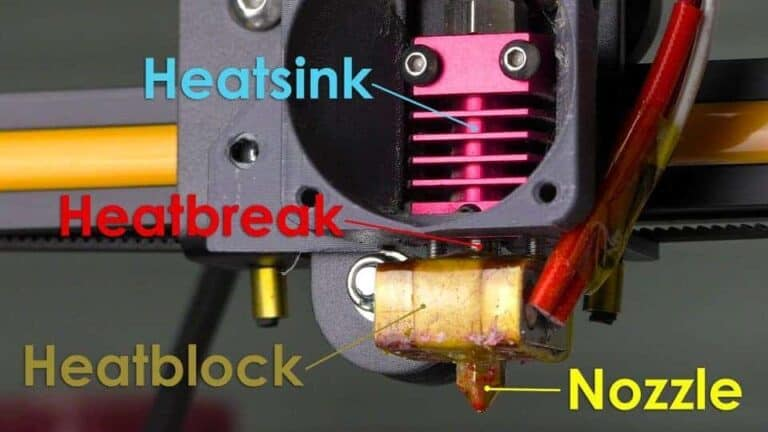
Heatbreaks are the parts that connect the filament path from the heatsink on your hotend to the heater block. These parts are delicate so care must be used when handling them. This article has general information that applies to most heatbreaks as well as specifics for heatbreaks that we carry.
Some heat breaks are all metal and some are “PTFE” types. They all install the same way. A “PTFE” type heatbreak will either have a piece of PTFE lining the inside of the heatbreak or allow the main PTFE tube to completely pass through it to the back of the nozzle. If you have a “PTFE” type that passes the main PTFE tube from your extruder to the nozzle then you need to make sure the end of the tube is cut flat and your PTFE fittings are holding the tube tightly. We carry PTFE tubes, PTFE cutters, and PTFE fittings for most 3D printers.
If you want more details on your 3D printer hotend and how all the parts work check out this article from Hobby Hoarder.
How to swap a Heatbreak
Swapping a heatbreak always needs to be done when the hotend is hot. This means at least 200C in temp. Be careful when working with the hotend as you can burn yourself.
You will need some tools to swap this part out. Here is what we recommend having before starting:
- 2 sets of normal pliers, not needle nose
- A socket or wrench that fits your nozzle
- Screwdrivers to disassemble your hotend assembly – Usually the hex wrenches that are included with your 3D printer
- Thermal Paste (Optional, but recommended)
Let’s begin!
- Remove the filament – Unload filament from your printer
- Get access – Take apart your hotend assembly to get easy access to your hotend itself. Depending on the machine you have this may involve removing hotend mounts, fans, and other parts that are covering the hotend itself.
- Pre-heat – Heat the hotend to 230C and let it get to temp. Remove any hotend coverings before heating up if your hotend has them (silicone socks, kapton tape, etc).
- Kill power – Disconnect power to your printer, be ready to work quickly.
- Remove the Heatbreak – Hold the heater block with a set of wide pliers and with another set of pliers unscrew the current heatbreak from the heater block.
- WARNING: Make sure you grab the heater block on a side where you will not crush any wires going to the heater block. If you damage these wires you can damage the hotend and/or your control board.
- NOTE: Some hotends (like Creality ones) have small grub screws that hold the heatbreak into the heatsink. If your hotend has these loosen them up so the heatbreak can be removed from the heatsink. Others like the V6 type have a heatbreak that threads into the heatsink.
- Check the temp – Your heaterblock should be loose at this point. Take care to make sure it doesn’t hit anything that could be damaged by the heat. Turn your printer on and check the temperature on the hotend. If it is under 200C have it heat up again to 230C and then unplug your printer once it is at temp again.
- Prep the nozzle – Hold the heaterblock with pliers again, make sure to avoid the wires, and screw your nozzle in all the way (not tight) and then back it out 1/4 turn.
- New heatbreak insertion – Still holding the heaterblock with your pliers, screw in the new heatbreak until it contacts the rear of your nozzle in the heaterblock.
- Put it back together – Re-assemble the hotend in the reverse order that you took it apart in.
- Apply Thermal Paste (optional, but recommended) – When installing the heatbreak you can apply thermal paste/grease (like what is used on computer CPUs) to the outside that inserts into the heatsink before installation. This will improve thermal transfer from the heatbreak to the heatsink.
- Hot tighten – Once the hotend is re-assembled you will want to heat the nozzle up to 230C (250C if you are installing an all metal heatbreak) and then tighten the nozzle.
- NOTE: This step is critical as if you do not tighten the nozzle filament will leak during a print.
- WARNING: Do NOT overtighten the nozzle. You should use a spanner wrench or normal socket wrench and only as much pressure as you can apply with one finger.
Congratulations! You have now swapped out your heatbreak.
It’s leaking! It is common to get some leaking when you swap a nozzle or heatbreak. If you do notice a leak then stop the print, heat up the nozzle, disconnect power, turn the nozzle out 1/4 turn, and tighten it again. Sometimes it doesn’t seat correctly on the first try and requires you to re-hot-tighten the nozzle against the heatbreak. The bottom of your nozzle should NOT be flush with the block (there should be a small gap). If there is not a gap then you need to thread the heatbreak further into the heater block.
